Appliance Repair diagnosis
 Types of defrost system
The next step is to determine which type of defrosts system your refrigerator has. There is two basic types of defrost systems: one is mechanical defrost and the other is adaptive defrost. Mechanical defrost systems use a mechanical timer to initiate a defrost cycle every so often. Most defrost timers will run a defrost cycle every 6, 8 or 10 hours for 30 minutes. Under most circumstances it is unnecessary to run a defrost cycle as often as a mechanical timer; therefore, mechanical timers are inefficient, which brings me to adaptive defrost controls. Adaptive defrost controls use an electronic control to determine when the refrigerator needs to run a defrost cycle. This is much more efficient because with adaptive defrost systems, defrost cycles can be up to 48 hours apart; therefore, there is no wasted energy on an unnecessary defrost cycle.
Now that you know about the different defrost systems, I will tell you how to determine which of the two your refrigerator has. First, locate the defrost control. Common places to look for defrost controls are near the temperature control in the fresh food section, behind the toe plate near the bottom and sometimes on the back of the refrigerator. Check to see if your refrigerator has a mechanical timer or an electronic control. GE side-by-side refrigerators do not have separate defrost controls; they have a main board that controls every aspect of the refrigerator. There is more on this type of defrost system below.
Mechanical defrost system
 If your refrigerator has a defrost problem and you determine your refrigerator has a mechanical defrost system, follow the steps below to determine which part you will have to replace to repair the problem.
1. Locate the timer and slowly turn it until the compressor and fans turn off. By doing so, you have manually placed the refrigerator in a defrost cycle.
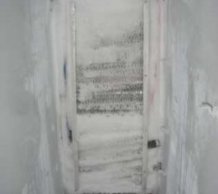
2. If you haven’t done so, remove the back wall of the freezer to access the evaporator coils. Wait 10-20 minutes to see if the defrost heater has come on. If the heater has come on you will either see it glowing red or you will hear the sound of water hitting a hot surface.
If the heater comes on there is no need for further diagnostics; you will need to replace the defrost timer. Unplug the refrigerator and melt the ice or let it melt on its own. Note occasionally this will be a false diagnosis because sometimes the defrost thermostat will be the problem, yet the heater will still come on when you perform this test, so to be sure you may want to replace the timer and the thermostat. If the heater doesn’t come on continue to the next step.
3. Unplug the refrigerator and melt the ice or let it melt on its own.
4. Once the ice is melted, check the defrost heater with an ohmmeter. If it is open or grounded out, replace it. If the heater checks ok replace the defrost thermostat.
Below is a picture of a bad defrost thermostat, so if yours looks like the one in the picture there is no need for further diagnostics. Just replace the thermostat but note that if the thermostat doesn’t look like the picture it can still be bad so you will need to check it.
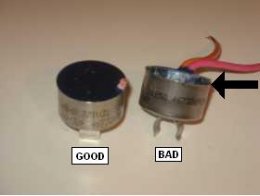 Notice how the plastic cap on the one on the right is coming apart from the metal thermostat. This is an indication of a bad thermostat that must be replaced with no testing necessary. However, the one on the left looks fine however you should still test it because it still could be bad.
Adaptive defrost system
If you determine that your refrigerator has a defrost problem and it has an adaptive defrost system, this section will help.
1. Since you cannot force the refrigerator into a defrost cycle on most models, go ahead and unplug the refrigerator.
2. If possible check the defrost thermostat before the ice is melted. If you don’t, you will not be able to check the thermostat because it will have to be cold at the time of testing. If the thermostat is below 40 degrees it should check closed with an ohmmeter and if it is open, replace it.
3. If the thermostat isn’t bad, melt the ice and check the heater with an ohmmeter and if it is open or shorted, replace it.
If the heater and the thermostat both check ok, replace the adaptive defrost control.
Note: This section applies to all GE side-by-side, some GE top freezer models, and some GE bottom freezer models with main control boards. If the refrigerator has a main control (with the exception of French door models) this section will show how to diagnose a defrost problem.
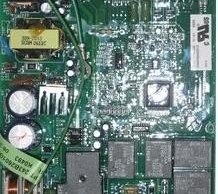
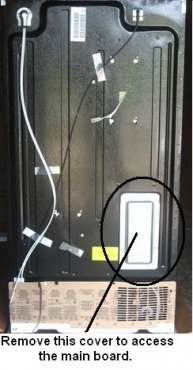 Below is a picture of a main board that will be located on the back of GE refrigerator models covered in this section.
GE electronic refrigerators have a main board. This main board controls every function from defrost, fan speed, the compressor and even compressor speed. To control the defrost cycle, the main board monitors things such as how many times and how long the door is open, as well as length of past defrost cycles to adjust to environment and usage and adapts.
This ensures that the refrigerator doesn’t defrost too often while at the same time ensuring that it defrost enough to maintain the evaporator coils. There are four things that can cause a defrost problem on a GE electronic refrigerator and they are the main board, the defrost thermostat, the evaporator thermistor and the defrost heater. Follow the directions below to diagnose which of the four parts are bad.
1. Disconnect the refrigerator.
2. Locate the main board on the back of the refrigerator.
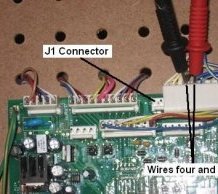
3. At the bottom of the main board you will see two plugs: one is blue with three wires and the other is white with nine wires, disconnect these two plugs. From these two plugs you can check the defrost heater and thermostat circuit with an ohmmeter.
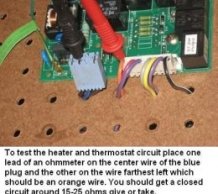
4. Check for continuity from the J9 wire to the J7 pin 9 wire. Note that the J9 wire is the center wire on the blue three-wire connector and the J7 pin 9 is the orange wire on the white plug, which should be the wire that was connected furthest left. If this circuit is open skip to step 6. If the heater and thermostat are not faulty, you should get a closed circuit around 15-25 ohms, give or take. If you are working on a top-freezer or bottom-freezer you may get a higher ohm reading, (25-50 ohms) this is ok as long as it isn’t extremely high. If this is the reading you get on this test proceed to step 5. If the ohm reading is extremely high or open
5. If the heater and thermostat check ok (closed circuit) you need to check the evaporator thermistor.
Please note that this test must be done before the ice is melted; however, if you have already melted the ice, refer to this page. It will show how to test the thermistor after you have melted the ice.